- Home
- Arduino Hardware
- Arduino Nano PWM Pins
Arduino Nano PWM pins
There are six Arduino Nano PWM
pins and they are the same for Arduino Uno and Arduino Nano (the same
pin numbers / and internal timers are
used).
PWM or Pulse Width Modulation is just the description of the
signal type and all it means is that you turn an output on and off, but
vary the timing of the edges i.e. control the pulse width of the signal.

In the diagram, the dotted line represents the average voltage, if
the signal was smoothed e.g. by using a capacitor. You can see that, for
each row, the digital signal is:
- Mostly off - low smoothed voltage,
- Evenly on and off - smoothed voltage is half the supply,
- Mostly
on - high smoothed voltage.
Smooth the digital signal using a capacitor gives you an analogue voltage, varying from 0V to 5V, with 255 steps of resolution. You can find more detailed information on Arduino Analog PWM signals in the link.
A PWM signal generates an analogue signal using a purely digital output! You can use it to create
breathing led or generate an audio output...and more.
Arduino Nano PWM pins:
Nine things you need to know
- The first thing know about Arduino Nano PWM pins are the pin
numbers. Here are the numbers for Arduino Nano PWM pins (and timers
associated with each pin):
- The second thing to know about Arduino Nano PWM pins is that
they are only available on specific pins and this is because timer
outputs are used to generate PWM signals, and timers only send outputs
to specific fixed pins.
- The third thing to know about Arduino Nano PWM pins is that
because timers are used to generate PWM signals you may not be able to
use timers for other purposes.
Timer0: Is used to operate the millis(), micros() and delay() functions that require Timer 0 to be left alone (this allows those functions to work correctly and also generate a PWM signal). By left alone I mean: don't change Timer0 operations using Timer0 control registers.
So in the case of Timer0 the pins can be used for PWM, while at the same time Timer0 operates the timing functions
This PWM signal is of a different frequency than the others due to the dual operation (Arduino delay functions and PWM).
Timer2: Although not used unless you want to generate tones (Using the Arduino tone library) Timer 2 is used for tone generation. If you use it with the tone library for tone generation, then you can't use the PWM outputs. Note that there are work around (different) libraries that use Timer1.
- The fourth thing to know about Arduino Nano PWM pins is that
there are 6 available PWM signals. This is true as each timer has two
outputs specifically for generating PWM signals and there are a total of three timers available.
-
The fifth thing to know about Arduino Nano PWM pins is that Arduino Uno
and Arduino Nano share the same PWM pins i.e. they are identical and
have identical pin numbers. It means changing from Uno to Nano is
ultra-easy.
- The sixth thing know about Arduino Nano PWM pins is that the PWM signal is
8 bit resolution. This means that the resolution of the output is 1/256 of the total voltage. So fully on requires a value of 255,
and fully off requires a value of zero. So for half volts (2.5V) you
need a value of 127.
- The seventh thing to know about Arduino Nano PWM pins is that you can create two 16 bit resolution PWM outputs
if you use Timer1. By default T1 is setup the same as the other two PWM
outputs but by going uncer the hood you can change it to higher
frequency and resolution.
- The eighth thing know about Arduino Nano PWM pins is that the Arduino
function analogWrite(pin, duty-cycle) is used to set the analog voltage
at the pin.
- The ninth thing know about Arduino Nano PWM pins is that you must smooth the output using a capacitor/resistor or inductor/resistor pair: See the Arduino analogue output page.
-
Arduino pin 3 - Based on Timer 2 (Timer reg. OC2B)
Arduino pin 5 - Based on Timer 0 (Timer reg. OC0B)
Arduino pin 6 - Based on Timer 0 (Timer reg. OC0A)
Arduino pin 9 - Based on Timer 1 (Timer reg. OC1A)
Arduino pin 10 - Based on Timer 1 (Timer reg. OC1B)
Arduino pin 11 - Based on Timer 2 (Timer reg. OC2A)
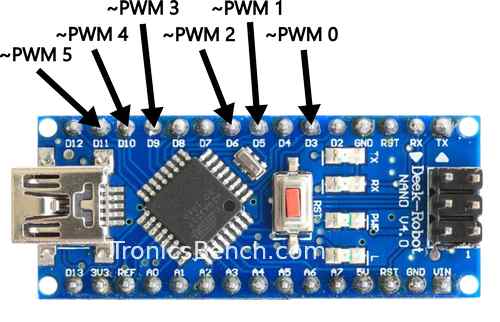
On an Arduino Uno, the PWM pins are easy to identify with their tilde
symbol '~' (indicating that they can produce an analogue varying
signal), but there is not enough room for that on an Arduino Nano
board (see the diagram above for where the PWM pins are located).
What can you do with PWM?
Here are a few possibilities:1. LED Brightness Control: PWM is widely used to control the brightness of LEDs, allowing you to create eye-catching lighting effects and conserve power - you know, that breathing LED.
2. Motor Speed Control: PWM is useful in controlling the speed of motors, such as DC motors and servo motors. By adjusting the duty cycle, you can vary the motor's speed smoothly.
3. Sound Generation: PWM can be used to produce simple musical tones or complex sound effects with the help of a speaker or a piezo buzzer.
4. Temperature Clsontrol: PWM is employed in temperature control systems, such as in thermostats or environmental chambers, to maintain precise temperature leve.
Conclusions
Pulse Width Modulation
(PWM) is a fundamental technique used in Arduino projects to generate an
analogue output voltage that you can supply to various components. The
Arduino Uno/Nano,
with its six PWM-capable pins, gives you a lot of flexibility with
analogue voltage output.
You can create a wide range of projects, from
LED lighting effects to complex audio output, to motor control which you can't do without PWM.
Don't use Timer 0 for anything other than PWM because it creates the
timing for functions delay(), micros() and millis(). And don't fiddle
under the hood with Timer 0.
Timer 2 is used in the tone generation library.
Timer 1 is the most flexible (least used by anything else) and one to
use if you want to PWM outputs but also want to change how it works.
Since Timer 1 uses a 16bit counter, you can create a higher resolution PWM output T1 - although you have to control internal registers directly to do this.
Note: Parts of this page were written using chatgpt
as a research assistant.
Site Map | Terms of Use
Search:
Recent Articles
-
Arduino Float to String: Find out how to do it Easily!
 Arduino Float to String: Is there a simple function that does this for you? What is the one thing you must do to ensure your program is reliable?: Find out here.
 -
Arduino light sensor: A beginner's tutorial on DIY light sensing
 A beginners Arduino light sensor tutorial showing you how to use an LDR (Light Dependent Resitor) for live light sensing on the serial monitor
 -
Arduino Capacitive Sensor: Single Pin Touch Sensing
 Arduino Capacitive Sensor: Using Internal Hardware with no extra components, for touch sensing. Whaaaatttt?... How is this Magic performed?
 -
Privacy Policy
The privacy policy for this site. -
Arduino ADC: Everything you Must Know about the Built-In ADC
 How does the Arduino ADC work? Should you use 1023 or 1024 in your calculation? Find out the sample rate and how to use the voltage reference.
 -
Arduino ISP: Recover Dead Arduinos using a Free ISP.
 Arduino ISP: Easily burn the bootloader back into an Arduino with an ISP programmer. Don't buy an ISP programmer; use another Arduino as a Free ISP.
you so so so much
for all the information
you have provided in
your site it's
SUPERB and FANTASTIC."
- Ranish Pottath
the best and my favorite.
I find here many useful
projects and tips."
- Milan
bursach<at>gmail.com<
very, very easy and nice
to navigate!"
- Matt
matt_tr<at>
wolf359.cjb.net
"I am a newbie to PIC
and I wanted to say
how great your
site has been for me."
- Dave
de_scott<at>bellsouth.net
and perfect work.
congratulations."
- Suresh
integratredinfosys<at>
yahoo.com
words to define
yourweb site.
Very useful, uncovered,
honest and clear.
Thanks so much for
your time and works.
Regards."
- Anon
Comments
Have your say about what you just read! Leave me a comment in the box below.
Don’t see the comments box? Log in to your Facebook account, give Facebook consent, then return to this page and refresh it.